We all have old film negatives—either in our family archives or as part of our photographic portfolios—that often come in a variety of shapes and sizes. The following is a how-to guide for archivally storing negatives, with the joy of discovering forgotten treasures as part of the experience!
Whether you’re a professional photographer with a large archive of 35mm / 120mm / or 4×5 film and negatives, or a family historian or genealogist with many personal snapshots, here are some simple procedures and products to ensure that all your irreplaceable negatives are archivally safe, identified, and accessible for generations to come.


Storing Negatives: Find Your Hidden Treasures

The first thing to do once you’ve found your negatives is to spend some time looking closely at each frame. Remember to wear cotton or nitrile gloves when handling negatives and prints! A light box and magnifying glass or loupe are great tools for this task. If you don’t have a light box there are apps for smartphones that let them function as one.

Looking through old negatives can be a bit challenging due to the fact that the colors or tones are reversed, but you’ll be rewarded by finding images you didn’t even know existed.


If this is the case with negatives you find in your family collection, consider getting those negatives scanned and then reprint missing snapshots for your own photo album, to mat and frame, or to share with other family members.
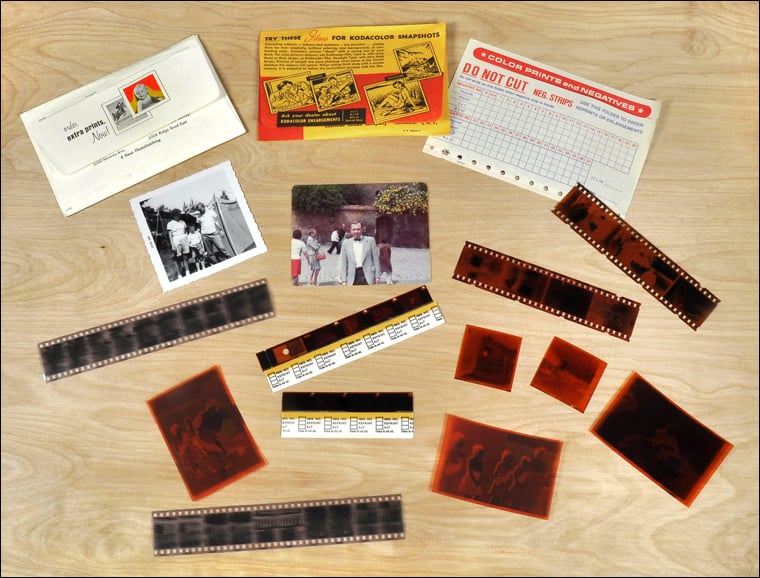
As an example, the color negative above was found without a corresponding print. By scanning this negative a new print was made of this photograph of the author’s now 60-year-old sister’s Girl Scout initiation from the mid-1960s that has not been seen by anyone in the family for over 50 years.
Storing Negatives in the 4 x 6 Archive 900 Kit
Once you’ve looked through your negatives and scanned and printed wonderful or missing images, it’s time to think about what organizational and storage methods will work best for you.
One option, the 4 x 6 Archive 900 Kit, will hold up to 900 of your 3-1/2 x 5″ or 4 x 6″ prints and their negatives, providing you with both easy access and the peace-of-mind of knowing that your images are safe. You can opt to purchase an additional package of Archival Photo Envelopes and increase the capacity of the Kit to 1,188 prints.

Let’s return for just a moment to our old photo processing envelope from the top of this blog, as our 4 x 6 Archive 900 Kit is specifically designed to include important identification and organizational information—once you’ve actually found this information.
This contains a number of valuable pieces of information, including the name of the individual who originally dropped off the roll of film to be processed, where they lived at the time (see blue box in upper left corner), and the date it was processed (see green box on the lower left).

All of this information is important, and can be written (with an archivally-safe pencil or pen) in the spaces provided on the acid-free 4 x 6 Archive Envelopes that are available separately or come as part of the 4 x 6 Archive 900 Kit. The negatives are stored in their own protective pocket in the envelope.

When writing identification or organizational info, be sure to write on the envelope before you place your prints and negatives inside it in order to prevent pencil or pen pressure damage.
Film Storage Kits
When it comes to storing negatives, many professional and fine art photographers use our all-in-one 35mm / 120mm / & 4×5 Film Storage System kits for quickly organizing and retrieving the thousands of negatives they often have.


Each Film Storage Kit, available in 3 sizes, offers you 3 layers of archival protection and organization.
1. put individual negatives, transparencies, or strips of negatives into either polyester or polypropylene Side Lock Film Sleeves
2. next put “rolls” or a collection of these strips into Negative File Folders (35mm & 120mm) or Open End Envelopes (4 x 5) which can be labeled and sorted
3. lastly, put them into the acid-free, lignin-free, buffered Hinged Lid Box and add the Label Holder to the outside of your box
Organizing and archivally storing negatives has never been easier than with these versatile Film Storage Kits!
Four-Up Negative File Kit
Another convenient kit for storing negatives is our 35mm 4-Up Negative Kit, which uses the same three-component approach as our Film Storage Kits yet is sized for the shorter 4-image negative strips commonly used by many commercial processing labs.
You can write whatever notes or organizational information on the individual Negative File Folders and the All-Purpose Index Cards that are part of this compact kit.

Odd Sizes and Glass Plates
Some of the vintage medium format films like 127 film are odd sizes and were often cut into individual frames. We sell some small Polyester Side Loading Print Sleeves that would hold some of these odd sizes. You can place them in the same 4×6 Archive Envelope with the snapshots that remain from this original roll of film before being placed into the 4×6 Archive 900 Kit.
The old 110 film used in the Kodak Pocket Instamatic Cameras from the 1970s-1990s also need attention when it comes to archivally storing negatives.


This is easy to do, as these negatives will fit in 4×6 Archive Envelopes as part of the 4×6 Archive 900 Kit, or they can be placed in 35mm Side Lock Film Sleeves—which can be trimmed to whatever size you need with ordinary scissors—and then placed in Negative File Folders, all of which are available separately or as part of our complete Film Storage System kits discussed above.
You might have old glass plate negatives in your family archive. Make or hire someone to make hi-res scans that you can print and share. Once that is done these delicate objects can be placed into deep storage and you can safely use your new scans for printing images for photo albums or scrapbooks, or for custom matting and framing.

Glass negatives are usually 4 x 5″, 5 x 7″, or 8 x 10″. We offer HD Poly Envelopes and Open End Envelopes in all of these sizes. You can use either or both. The Poly Envelope is nice because you can see the image but the paper envelope has room for you to write important identification information on it in pencil or archival ink, before inserting the negative into it.


After you have scanned your glass negatives, we recommend placing them in the matching-sized enclosures, and then into an appropriately-sized Hinged Lid, Short Top or Drop Front Box. We also recommend interleaving each glass plate with a similarly-sized sheet of 1/8-inch Acid-Free Foamboard. This will insulate each plate from contact with others, while the Foamboard will not add any significant weight to your storage box. If the box is not full you will need to use a Photo Box Spacer or crumpled Archival Tissue to make sure the plates remain upright.
By following these suggestions for storing negatives you can rest assured that your materials are safe, secure, organized, and properly identified—while revealing treasured images you may not have known existed.
Please contact us if you have any other questions regarding storing negatives as we’re always there to help with friendly, personal advice.
Blog Updated: February 4, 2026