Do you have boxes of old photos stashed away in your home? People often store old photos in basements, garages, or attics, which are the worst places for them. This post will provide steps on how to store old photos to preserve them for future generations to enjoy.
Location
Avoid Attics, Basements, and Garages
This is the easiest step and doesn’t cost a dime. Your home and storage location within it is an important aspect of preservation. If your photos are stored in an attic, basement, or garage, move them. These areas are high risk. They are likely to experience temperature and humidity extremes and fluctuations, which are very bad for photographs.
They are more prone to flooding and water damage from leaky roofs, pipes, or water heaters. They are also more prone to insects and other pests which can damage photos and collectibles. These spaces are not used as often, so if something like a leak happens it’s more likely to go unnoticed for longer, causing irreversible damage.

The Ideal Second Story Closet
The ideal home storage spot is a second floor interior closet shelf. If there’s not room for a shelf then the closet floor is okay. Second floor is good because it is not likely to be underneath a bathroom or pipes which can leak. Interior walls are better because exterior walls experience more temperature fluctuations.
Underneath a bed on a second floor is an okay choice if no closet is available. But this space will experience much more dust than a closet.
If storing your photos on the ground floor, store them on a shelf. If your house is ever flooded, higher is safer.
Storage Containers

Storing 4 x 6 Photos
Transfer your photos from the shoebox or other acidic container into an archival, acid-free, lignin-free, buffered box or binder. Check out Boxes Versus Binders for help deciding which one is more suitable for your project.
We have a selection of great Photo Storage Kits but the two most popular ones are the 4 x 6 Simple Kit and the 4 x 6 Archive 900 Kit. They are great for storing large quantities of 4 x 6 photos.
The 4 x 6 Simple Kit comes with archival Index Card Dividers for sorting and labeling along with a Photo Box Spacer to keep the photos upright when the box isn’t full. But if you don’t need these extras, just order the 04-003 Short Top Box. It will hold up to 1,050 photos!

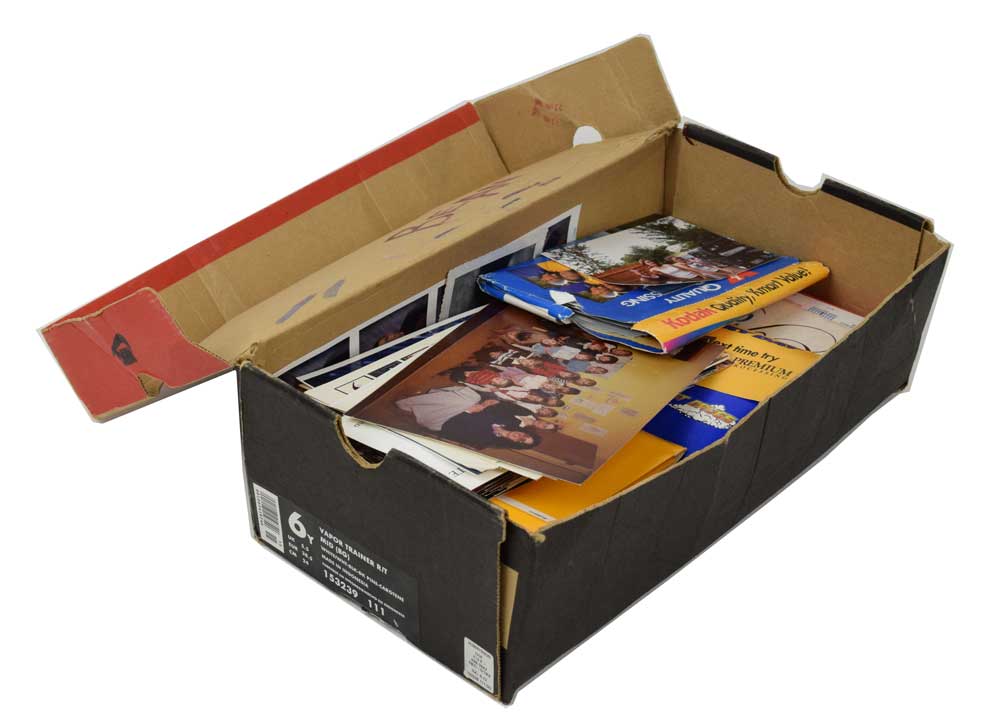
Storing Mixed Photo Collections of Various Sizes and Types
While 4 x 6 photos make up the bulk of many photo collections, there are others, such as the one pictured above, that have a wide variety of photo processes, shapes, and sizes. The minimal amount of effort and expenditure would be to put them in an archival box (from a reputable company) and store them on a closet shelf. And simply doing that would be a great start if you don’t have the time or money to do more at this point.

Create-a-Kits
Create-a-Kits are photo storage kits designed to hold various photos and collectibles inside caddies within an archival metal edge box. There are pre-assembled options in small and large or you can select your components to create your own combination.

Drop Front Boxes for Larger Photographs and Albums
If you have some larger photos in your collection I recommend an archival Metal Edge Drop Front Box. We offer them in 1-1/2″ and 3″ depths. Drop front means one edge on the base of the box is left unattached so it can fold down when you need to remove the contents. This helps avoid damaging your photos during removal. The lid keeps the loose side closed during storage.
You can place the individual photos in polypropylene 3-Side Sleeves or polyester Side Loading Print Sleeves which protect them during handling and from each other. Or, you can use an archival Paper or Tissue to interleave the photos.
Organizing Your Photos

Organizing your photos can be challenging, which is why there’s a whole new industry of Photo Organizers who will do it for you. But the DIY approach is totally doable! The challenge depends on the scope of your collection and how much information you have about the photos.
Organizing means finding a system for sorting and filing your photos that makes sense to you. Chronological is a common method and genealogists might sort using family trees.
Organizing also means identifying people, dates, events, and locations whenever possible. If you have older family members to help you identify your photos, schedule a time to do that. You can even make a recording with your phone of your session to refer to down the road if you aren’t going to tackle your project right now.

Archival Index Card Dividers are a good tool when it comes to organizing and labeling photo collections. We sell several sizes and designs to fit different boxes and caddies. We now offer a 4 x 6 Budget Kit which comes with card stock to use as dividers.
Caption Pocket 4 x 6 Photo Pages include a center area for captioning your photos. Check out Tips for Labeling Photos and Snapshots for more on this topic.
Storing Photo Albums

Here’s a great overview of the various photo album types by Cornell University Library Conservation. When it comes to how to handle photo albums the common question is whether or not to leave the album intact or remove the photos.
For vintage (pre-1950s) photo albums such as the one above we usually recommend keeping the album intact and improving its storage conditions. Read Archival Storage for Scrapbooks and Vintage Photo Albums for more info.

For magnetic albums that were popular in the second half of the 20th century, we recommend removing the photos and storing them in a safer environment. The paper, adhesives, and plastics used to make these albums are usually not archival and will hasten deterioration. In the above example the yellowing along the edges is visible proof of the glues breaking down. See Ditch Your Magnetic Photo Albums for more info.
These are just a few tips to get you started organizing your photos. We hope this helps inspire you to save your photos! Contact us if you have questions. We’re happy to help!