Many contemporary framed pieces are not framed using archival supplies and it’s hard to tell. But vintage framed pieces almost certainly were not framed with archival supplies. Learn how to archivally frame a vintage photograph using acid-free mat board and UV-filtering acrylic.
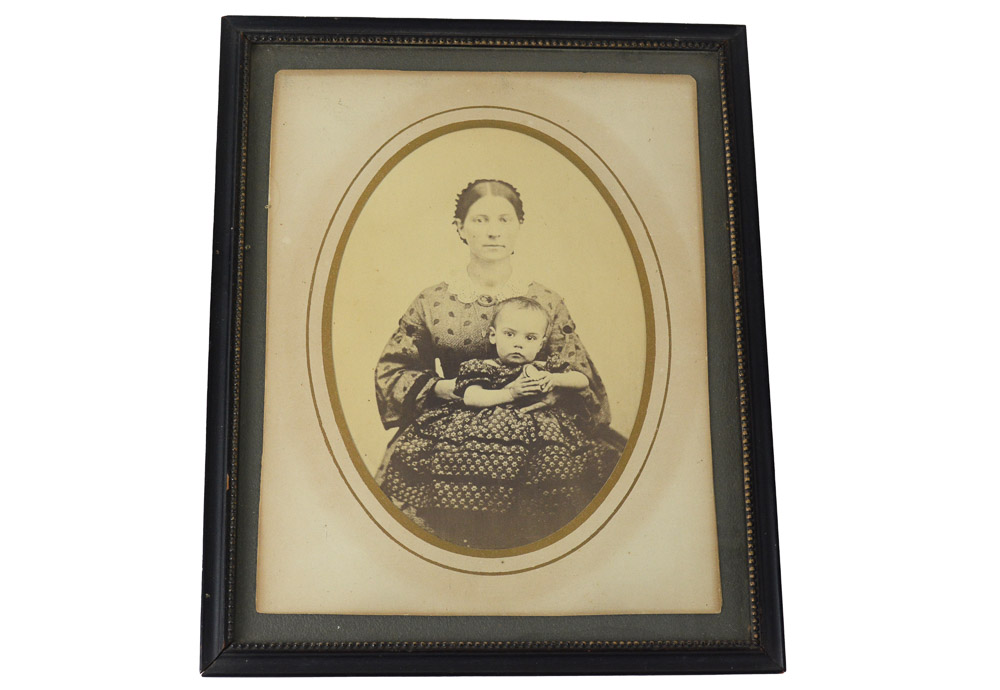
I collect found photographs and one of my treasures is this framed Civil War era albumen or salted paper portrait of an anonymous woman and young child. It has been hanging on my bedroom wall out of direct sunlight for a number of years. I finally got around to reframing it with some archival supplies and saw it as an opportunity to illustrate some dos and don’ts of framing photographs.
Disassemble the Frame
Many old wooden frames used nails to attach a backing to the frame. Unfortunately, thin wood was often used as a backing. When we talk about acid-free and lignin-free we mean all the things we remove from wood pulp that makes it damaging to photos and paper. So using it as a backing board is bad to say the least.

You Never Know What You Will Find
Opening up an old frame can be exciting because there’s always the possibility that you will find something interesting. If you are really lucky, you’ll find identifying information such as who is in the photo, and where and when it was taken. Check out Tips for Writing on Photos and Snapshots so you can make someone’s day 100 years from now.
I used needle nose pliers to remove all of the nails from the frame. I removed the picture hanging wire and the screws holding the wire. The next layer after removing the wooden backing was this.

Assess What You Uncover
What is under those red and white stickers? Surprise! Another photo!

Even though no one wrote who this woman was or why they put her in the back of the frame, we did get a studio label on the front. It says Finley & Brace, Canandaigua, NY which is not far from Rochester. Searching online I found a few references to the photography studio. One only mentions Finley. And this clipping from 1899 was the only mention of Finley & Brace that I found.

The mounted photograph of mystery woman #2 was taken some time later than the front photo – probably around the turn of the century. The way it is mounted and her clothing and hairstyle give clues to when it was made. Graphic Atlas is an excellent resource when trying to identify and date your old photographs.
The question on my mind is are the two mystery women related? If the mystery woman with child photo was taken roughly between 1865-1875 then perhaps mystery woman #2 is the child as an adult. It’s fun to speculate but we will never know.
I flipped the photograph over to view the front and removed the oval paper mat. This is the most jury-rigged frame job! Why is this photo mounted to another oval mat which is mounted onto a dark gray board? The edges of the photo are adhered to the mat below it. Those brown squares are old tape residue.


As you can see, none of the materials used to frame this photo were acid-free or archival. Acid-free paper and archival mats likely did not exist when this was all put together. But luckily, they do now!
Scan It!
At this point, I highly recommend making a hi-res scan of your photograph. If you can’t do it yourself there are many scanning services available. The Photo Managers can help you Find a Pro.

I made a second close-up scan of her brooch to see the man’s face better.

If this was a photo of one of your ancestors and you wanted to minimize further deterioration, then I would say store it safely in an archival binder or box, away from light in a closet in your living space. Also, use pencil to write identification info on the back of it. If you want, you could make a print from your scan and frame the reproduction to hang in your home.
In this case, I just love the image and want to continue seeing it. I am going to reframe the original using mostly archival supplies to help slow down the deterioration.
How to Frame it Archivally
Since the photo is adhered firmly to the mat, I can’t separate it without damaging it. So, I am leaving it on the non-archival paper mat. If you wanted to separate them safely, you would contact a conservator to do it.
I measured the opening of the original oval mat and it was 5″ wide by 7″ high so I went to the Custom Mat Cutting page and entered in the data I wanted. All of our Mat Board is archival, acid-free, lignin-free, and buffered for maximum long-term protection. Order a Board and Paper Sample Pack to help make the best color and thickness selection for your project.
I chose 4 ply antique white museum board for the window mat and 2 ply for the backing board. I chose to have it hinged on the long side, and the window oval and centered.


Naturally occurring oils on our hands are damaging to photographs. Therefore, I recommend wearing nitrile or cotton gloves when positioning the image within the oval window. Once I got it in place I put the 3-1/2″ Leather Paperweight on it so that it wouldn’t move around while I was putting the photo corners on.

Glazing
Glazing is a transparent barrier that protects artwork in a picture frame from damaging elements such as dust, pollution, insects, being scratched, and even light. It is generally recommend to use an archival mat to keep your photo from touching the glazing. Glazing is usually clear glass or acrylic, but not all glazing protects your artwork from sunlight.
Why use UV-filtering acrylic? Because ultraviolet (UV) light is extremely damaging to pretty much everything, and especially to photographs. Sunlight is one of the top agents of deterioration. Our UV-Filtering Acrylic is 1/8″ thick and blocks out 98% of UV light. You can order any size from us up to 32 x 40 inches. If you need a non-standard size, select one size up and request that we cut it to your specifications.


The protective paper layer can be difficult to get started peeling. Start at a corner. If using your fingernail doesn’t work, you can very carefully use an exacto blade to help separate a small corner piece from the acrylic.

The Frame
One could opt for a new frame but I like the vintage one it came in. There’s a small decorative edge on the frame that is reminiscent of her hair.
I affixed the new mat into the frame using a picture framing tool called a point driver. And, voila! Mystery woman and baby are reframed with archival mat board and UV-Filtering acrylic and back on my wall!

Do you have questions about archival storage and presentation? Contact us via phone or email and we will do our best to answer them!